
or
Why a Little Doubt Is Good for You (and Your Client)
We had a client come to us a little bit panicky, visibly stressed, and totally fixated:
“Our one-page checkout is screwed! Our conversion rates are dropping no matter what we do. Please make it go away!”
It was true. Their total e-commerce conversion rate had dropped from 1.8% to 0.6% in the last year. That’s a lot. One could even wonder how is it possible that they didn’t get any help sooner. But maybe that’s not so strange for a small company in an emerging industry, for which e-commerce is just a side business.
So we rolled up our sleeves and started with the low-hanging fruit. We set up Hotjar, double-checked tracking, did some testing, and did a general assessment. But we found nothing of value—no insights, nothing.
An idea crept in. How sure are we that the client knows where the issue lies?
We knew conversion rates had fallen—that was obvious. What was not obvious was what role was being played by the one-page checkout step. How could we observe what was wrong with this client’s funnel? Also, the reason for the client’s late discovery of this alarming trend was that revenue was not falling at all—even more reason to do a double-take on the situation.
What was needed was a chart where we could observe all of the e-commerce conversion values over time. Googling produced a couple of valuable resources. Most notable were Charles Farina’s blog and a piece by Michelle Kiss. Just a little bit of tweaking and modification was enough to get a super important insight into this particular client, which had a huge influence on the client’s marketing team focus.
Your E-commerce Conversion Rates Solved in These 4 Simple Steps
The steps towards geat e-commerce conversion rates in Google Data Studio:
1) Adding fields to the Analytics data source
2) Creating a Datatable for Each Shopping Stage
3) Blending the Datatables
4) Adding conversion rate calculations
All data in this blog is taken from Google Merchandise Store.
Step 1: Adding fields to the Analytics data source
I’ll assume you all know how to add a Google Analytics data source to a Data Studio report (if not, read this).
After adding, go to Resource → Manage added data sources.
Select your source, and click edit.
Press “ADD A FIELD” in the top right of the screen.
Name the field “Shopping Stage_formatted” and insert this formula:
CASE
WHEN REGEXP_MATCH (Shopping Stage, “ALL_VISITS”) THEN “1) All Sessions”
WHEN REGEXP_MATCH (Shopping Stage, “PRODUCT_VIEW”) THEN “2) Sessions with Product Views”
WHEN REGEXP_MATCH (Shopping Stage, “ADD_TO_CART”) THEN “3) Sessions with Add to Cart”
WHEN REGEXP_MATCH (Shopping Stage, “CHECKOUT”) THEN “4) Sessions with Check-Out”
WHEN REGEXP_MATCH (Shopping Stage, “TRANSACTION”) THEN “5) Sessions with Transactions”
END

After saving, return to the report.
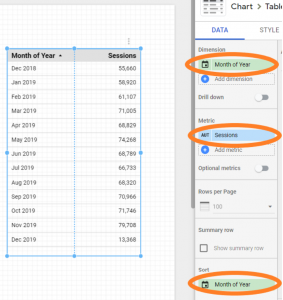
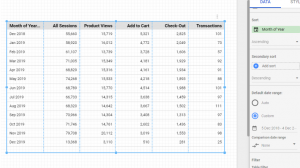
Step 2: Creating a data table for each shopping stage
Insert a data table and set it up this way:
Now copy this table four times. We will now apply filters to each of these five tables so that each table shows session counts for its respective stage.
The first filter could be something like this:

The others will follow. I highly recommend using the Resource → Manage filters menu for this work. With this tool, you can easily duplicate and modify the filters. Of course, you can also do all the filters by hand.
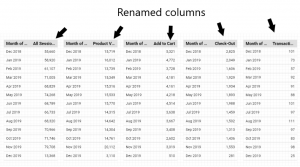
I also recommend renaming the “Sessions” metric name in each of the tables to the value of its filter to make it more descriptive of its content. This makes further data manipulation easier and less error-prone.
At the end of this step, you should have five tables, each filtered to a lower stage in the funnel, which usually means lower numbers. You’ll also get neatly renamed “Sessions” columns:
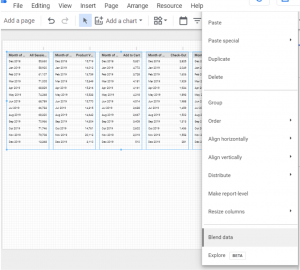
Step 3: Blending the data tables
This is easy. Select all the tables, one by one, starting with the table containing the “All Sessions” column, and continuing with the tables down the checkout funnel. Then right click and press “Blend data”:
A table will be created. You’ll have to set up a date range and sort again to get something like this:
Step 4: Adding e-commerce conversion rate calculations
The last step!
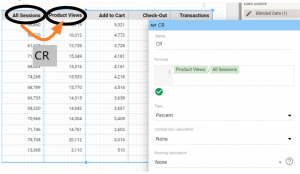
Here we will create calculated fields between pairs of columns.
Example: To get CR of All Sessions → Product views, create a calculated field with this setting:
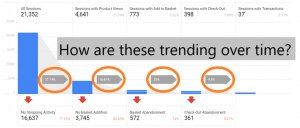
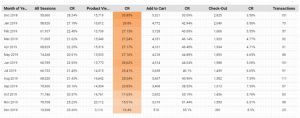
Do this for all of the checkout funnel stage pairs. You can now observe the trends to see which conversion rates are increasing and which are decreasing.
In our example of the Google Merchandise store, we can see that the conversion rate between sessions with product views and sessions with Add to Cart is decreasing. On the other hand, the conversion rate between sessions with transactions and sessions with checkout is increasing.
These kinds of insights could be very valuable!
The Aftermath: How This Helped Our Client
Remember when our client was panicking about the one-page checkout? Well, take a look at the funnel by month table for their case:

It is obvious that the issue is not in conversion between the check-out page and the actual transaction. That number stayed relatively stable at around 32%. The issue was in the falling conversion of visitors making product views. Well, it turns out that in this particular client’s industry, a huge trend was happening. Look at this Google Trends five-year chart for one of the related keywords:

This increase in the search made the client’s blog rank very high. There was lots of organic traffic. Unfortunately, the blog never had any CRO done on it. CTAs were not optimal, and just a small portion of organic visitors ended up on the product pages, which, of course, caused a drop in total CR.
So the conclusion:
The client thought they had a problem with one-page checkout.
We analysed trends in conversion rates between shopping stages.
A drop in conversion to sessions with product vies was observed.
We then found a substantial increase in organic traffic to their blog.
And the blog was not well optimized to lead visitors to products.
The aftermath: CRO was done on the blog + the blog got its deserved spot as one of the channels with the most potential.
Room for Improvement
This is just a simple e-commerce conversion funnel, not enhanced. It does not distinguish between sessions that came from Add to Cart to checkout and sessions that started directly with the checkout.
To build the enhanced version, I absolutely encourage a thorough reading of Charles’ Farinas blog, where an abundance of hints for the task can be found.
E-commerce is our specialty so don’t hesitate to hit us up with your questions by emailing hello@goodish.agency!