Are you running an online store? If yes, you’ve probably heard of Shopify and WooCommerce. These are the go-to platforms for people who want to sell things online. Both platforms come with lots of add-ons, known as plugins, to make your store even better. One plugin you really should think about using is GA4
Why is Google Analytics 4 so important? Well, it helps you understand your customers better. You can see what products they look at, what they put in their shopping carts, and much more. This information can help you make smarter decisions for your store.
In this blog, we’ll walk you through how to get GA4 up and running on both Shopify and WooCommerce. We’ll also talk about why this plugin can be a game-changer for your online business. So, whether you’re new to online selling or looking to improve your store, this guide is for you.
In need of an agency that excels in Google Analytics 4 and consistently delivers tangible results? Goodish Agency is your answer. Discover our GA4 expertise.
Why Google Analytics 4 (GA4)?
Curious about why everyone’s talking about Google Analytics 4? You’re not alone. Let’s get into why it’s a game-changer.
It’s All About Your Customers
Firstly, GA4 focuses on helping you understand your customers. Imagine you own a physical store. You’d want to know how people move around, what they look at, and what they end up buying, right?
GA4 does this but for your online store. It tells you what people are clicking on, what they’re adding to their carts, and much more.
Real-Time Information
It gives you real-time information. This means you can see what people are doing on your website at this very moment.
Keeping Track Across Different Places
Let’s say someone looks at a product on their phone but decides to buy it later from a computer. GA4 can track that! It keeps an eye on customer behavior across different devices. This is super helpful because it gives you a complete picture of how people interact with your store.
Predicting the Future (Sort of)
One of the coolest things about GA4 is that it can make predictions. For example, it can guess which products are likely to become bestsellers based on current trends. While it’s not a crystal ball, it’s the next best thing to help you plan for the future.
It’s Not Just an Update; It’s the Future
You might think GA4 is just another update, but it’s much more than that. It’s like moving from a regular phone to a smartphone. It’s designed to meet the future needs of online stores, making it a smart choice for anyone serious about growing their business.
Setting up GA4 on Shopify
Why Shopify is a Good Choice
Before we jump into the steps, let’s talk about why Shopify is such a great choice for online sellers. Shopify is like a one-stop-shop for anyone wanting to sell things online. It’s super easy to use and you can choose from tons of cool designs to make your store look professional.
Plus, it offers a bunch of add-ons, known as plugins, to make your store even better. One of these must-have plugins is Google Analytics 4, and we’re going to show you how to set it up.
Step-by-Step Guide
Step 1: Create a Google Account and Google Analytics Account
If you haven’t already, you’ll need to set up a Google account. Once that’s done, proceed to create an account on Google Analytics.
Step 2: Set Up or Transfer a GA4 Property
To get GA4 up and running, you have two options: either create a new GA4 property or transfer an existing one. Don’t forget to jot down the Tag ID, as you’ll need it in the next step.
Step 3: Integrate GA4 Tags into Your Shopify Store
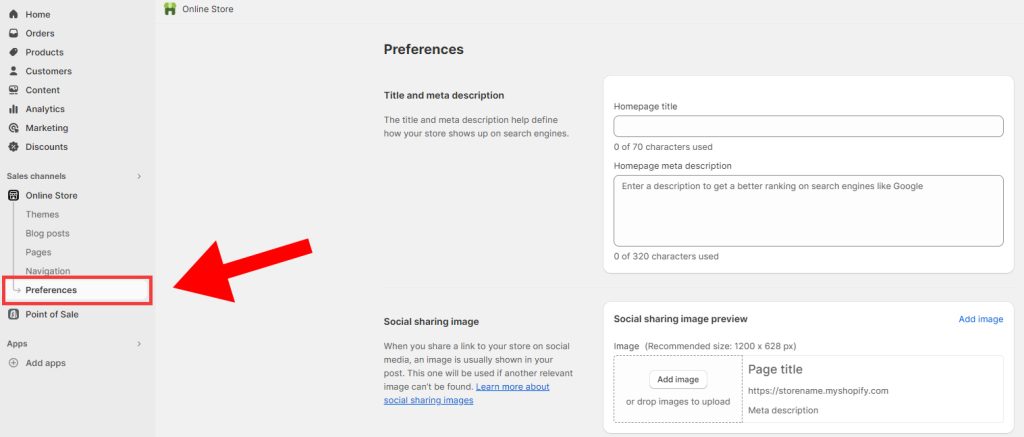
1. Navigate to your Shopify admin panel and select Online Store > Preferences.
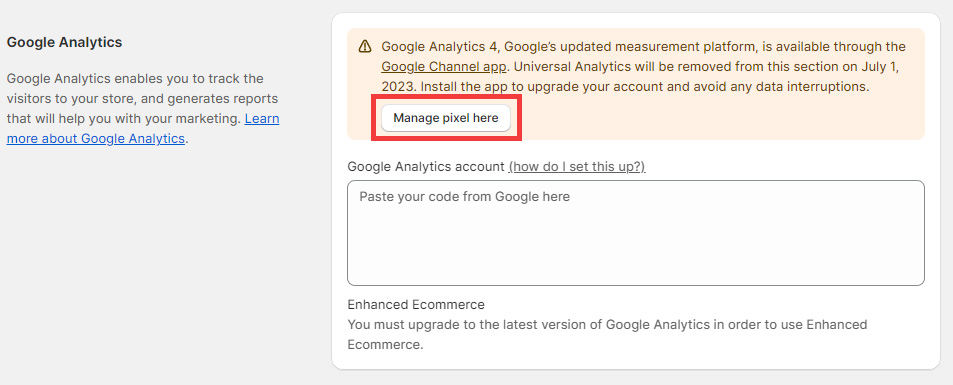
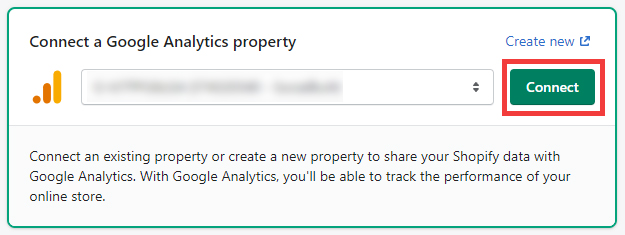
2. In the Google Analytics section, click on the option that says “Manage pixel here.”
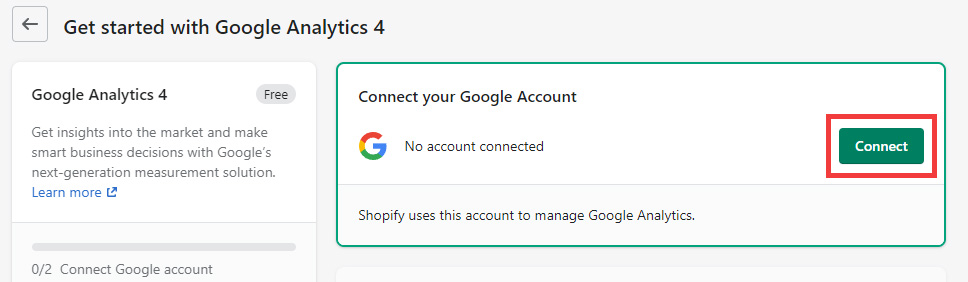
3. From there, you’ll be prompted to link your Google account.
4. Choose the Tag ID corresponding to your GA4 property
5. Click on “Connect your Google Analytics 4 property.”
Step 4: Associate Your Google Analytics and Google Ads Accounts
For a more comprehensive view of customer behavior, it’s advisable to link your Google Analytics property to your Google Ads account. This enables you to track conversions and create targeted audiences more effectively.
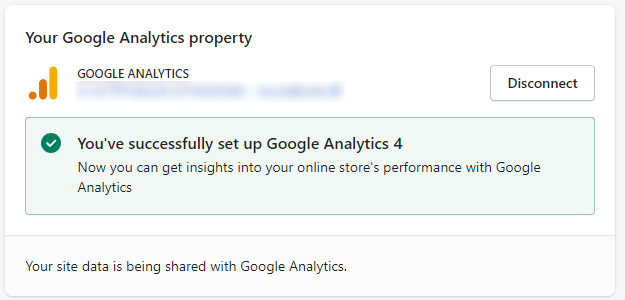
And there you have it! You’ve just set up GA4 on your Shopify store. Now you can start gathering all sorts of useful information to help make your store even better.
Setting Up GA4 on WooCommerce
Why WooCommerce is Awesome for Online Stores
WooCommerce is a top choice for people who want to sell things online, and there are lots of good reasons for that. First off, it’s built on WordPress, which is super popular and easy to use. This means you can make your online store look and work exactly how you want it to.
WooCommerce lets you sell pretty much anything, from physical items like clothes to digital stuff like eBooks or even subscription services like monthly gift boxes.
One of the best parts about it is that it’s open-source. This means lots of people are working on making it better all the time, and you can benefit from that. Plus, there are tons of extra features, called plugins, that you can add to make your store even better.
Here you should also think about using the Google Analytics 4 plugin. We’re going to show you how to set it up in the next section.
Step-by-Step Guide to Setting up GA4 on WooCommerce
Step 1: Get the Right Plugin
First, you’ll need to get your hands on the “Google Tag Manager for WooCommerce Pro” plugin. You can find this in the WooCommerce marketplace. This plugin is your gateway to integrating Google Analytics 4 into your WooCommerce store. Go ahead and purchase it, then install it onto your WooCommerce site.
Step 2: Plugin Configuration
Once the plugin is installed, you’ll see some on-screen instructions to help you set it up. Here’s what you’ll generally need to do:
1. Open your WooCommerce dashboard and navigate to the ‘Plugins’ section.
2. Find the “Google Tag Manager for WooCommerce Pro” plugin and click ‘Settings.’
3. You’ll be prompted to connect your Google Tag Manager account. Follow the steps to do so.
4. Next, you’ll set up your GA4 property within Google Tag Manager. This is essentially your store’s unique identifier in the Google Analytics world.
5. Once that’s done, make sure to save all your settings.
How to Set Up Custom Events in GA4
So, you’ve got Google Analytics 4 up and running on your Shopify or WooCommerce store. That’s awesome! But did you know you can track specific actions people take on your site?
These are called “Custom Events,“ and they can tell you a lot about how people interact with your store. Let’s go through how to set these up, step by step.
Step 1: Log Into Google Tag Manager
First, you’ll need to go to Google Tag Manager and log in. If you don’t have an account yet, you’ll need to create one. This is the place where you’ll manage all the special tracking tags for your website.
Step 2: Make a New Tag
Once you’re in, look for an option to create a new tag. A tag is like a tiny piece of code that helps you track specific things on your website. Click on it, and you’ll be asked what kind of event you want to track. This could be anything from someone clicking a “Buy Now” button to someone spending a certain amount of time on a page.

Step 3: Set the Triggers
After you’ve picked the event you want to track, you’ll set up what’s called a “trigger.“ Think of a trigger like an alarm that goes off when someone does a specific thing on your site, like clicking a button or filling out a form. Follow the instructions to set this up.
Step 4: Publish Your Changes
The last step is super easy. Once you’ve got your tag and trigger set up, you’ll need to make it live. Look for a “Publish” button and click it. Now, your custom event is all set up and ready to start gathering data!
Setting Up E-commerce Tracking Using GTM
Why Use GTM for Ecommerce Tracking?
Google Tag Manager (GTM) lets you add all sorts of features without having to mess with code. For online stores, GTM is a lifesaver. It lets you keep track of what your customers are doing, like adding items to their cart or making a purchase.
Step 1: Log Into Google Tag Manager
First, you’ll need to log into your Google Tag Manager account. If you don’t have one, it’s easy to set up. Once you’re in, look for a section called ‘Variables‘ on the left-hand side and click on it.
Step 2: Add a New Variable
After clicking on ‘Variables,’ you’ll see an option to add a new one. Go ahead and click on ‘New.’
Step 3: Name Your Variable
A box will pop up asking you to name your variable. Give it a name that makes sense to you. This is how you’ll identify it later on.
Step 4: Choose Data Layer Variable
Once you’ve named your variable, you’ll see an overlay appear for ‘Variable Configuration.’ Here, you’ll want to select ‘Data Layer Variable.‘
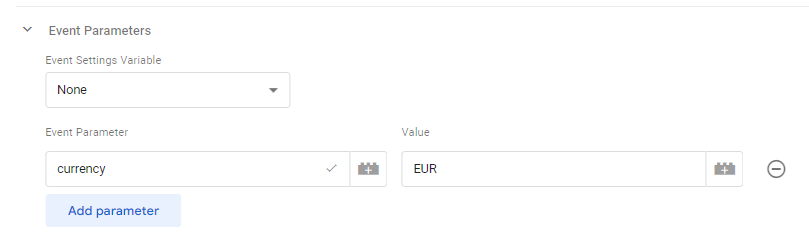
Step 5: Configure the Data Layer Variable
After you’ve selected ‘Data Layer Variable,’ a new section will open up. Here, you’ll need to type “e.commerce items” as the Data Layer Variable name.
Step 6: Save Your Settings
Last but not least, click ‘Save.’ You’ve now set up a Data Layer Variable, which is a crucial step in tracking ecommerce activities on your site.
Google Tag Configuration in GTM
Why Configure Google Tags?
Google Tags collect data on what’s happening—like who’s visiting, what they’re clicking on, and more. By configuring these tags in GTM, you can gather all sorts of useful information without having to be an expert.
How to Get Started
Step 1: Log Into Google Tag Manager
First, you’ll need to log into your Google Tag Manager account.
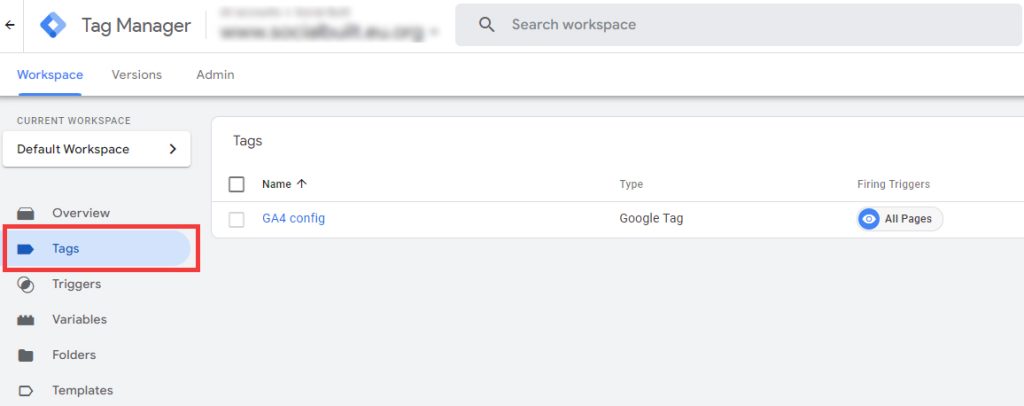
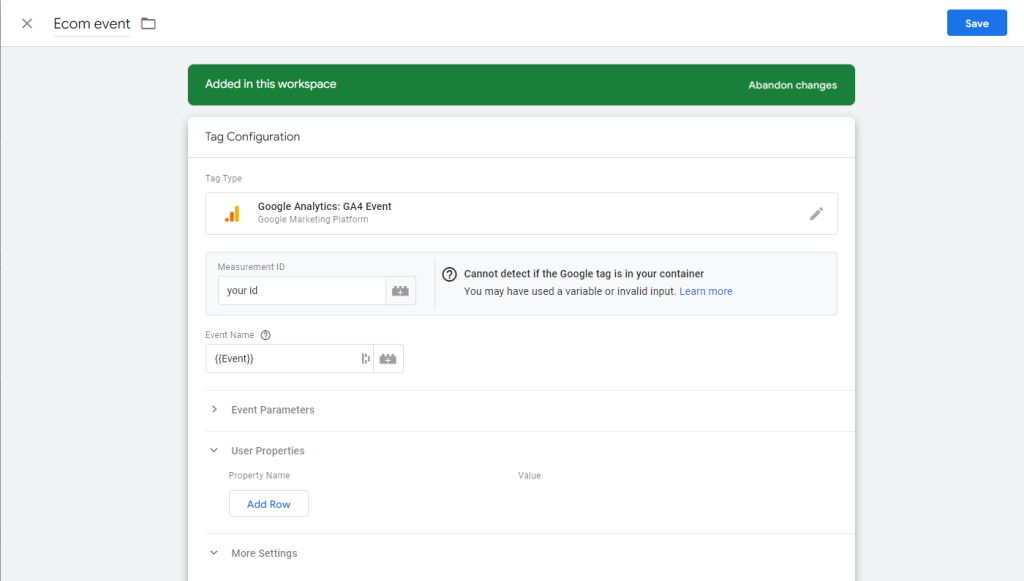
Step 2: Create a New Tag for GA4
Once you’re in, go to your workspace and click on “New Tag.” From there, you’ll choose “Google Analytics: GA4 Configuration” as the tag type. You’ll also need to enter your GA4 Measurement ID, which you can find in your GA4 account.
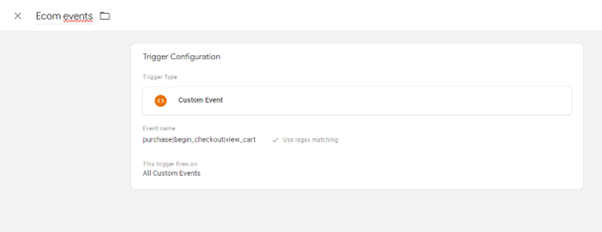
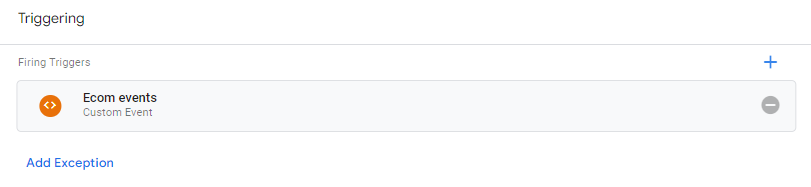
Step 3: Set Up Triggers for Ecommerce Events
Now it’s time to tell Google Tag Manager when to send information to GA4. You do this by setting up triggers. You can create triggers for all sorts of ecommerce events like when someone adds an item to their cart, starts the checkout process, or completes a purchase.
Step 4: Test Your Setup
Before you make anything live, you’ll want to test it out to make sure it’s working as expected. Google Tag Manager has a preview mode that lets you do just that. Make sure your GA4 tag fires for the ecommerce events you’ve set up.
Step 5: Publish Your Changes
Happy with your setup? Great! The next step is to publish it so it starts collecting data. Just click on the “Submit” button, and you’re good to go.
Step 6: Verify in GA4
Last but not least, you’ll want to make sure everything is working as it should. Log into your GA4 account and go to the “Events” section. Here, you should see data for the ecommerce events you set up.
Conclusion
Running an online store can be challenging, but having the right tools can make it much easier. Google Analytics 4 (GA4) is one of those essential tools you should consider using. It helps you understand what your customers are doing on your site in real-time and even predicts future trends.
In this blog, we showed you how to set up GA4 on Shopify and WooCommerce. We also covered how to use Google Tag Manager for more advanced tracking. These tools can give you important insights to help you make better business decisions.
We at Goodish agency are experts in digital marketing and we can help you to utilize AI to reduce your costs and boost your performance. Read more about our services.


![Wave.video vs Filmora Comparison [2023]](https://goodish.agency/wp-content/uploads/2023/09/Low-2-1024x683.jpg)