In this blog post, you will learn about basic concepts and features Google Tag Manager is offering to you. Reach out if you will need help with imoplementing GTM on your site.
Why should You Use Google Tag Manager
Tracking user journey
Let’s take a simple user journey. Product page, cart, checkout and thank you page. By default, Google Analytics will track just pageviews. This is enough to visualize a simple funnel and calculate drop off rates. But there is so much more that is happening in those pages. Like how many users are seeing the product video, how deeply users scroll through a certain page, which buttons they are clicking and so on. With Google Tag Manager we can easily set up events on different user actions and track them in our analytic system.
Integrations
Digital marketing is getting more and more complex. Everyone is using multiple analytics and advertising systems. With Google Tag Manager we can install Google Analytics, Google Ads, Facebook Pixel, Hotjar, Twitter, LinkedIn, and literally every tag that exists. The beauty of the Tag Manager is, that when we set up an event in the Tag Manager, we can send the same event in all of the systems we are using at once. Meaning that, for example, add to cart or scroll depth event is exactly the same thing in all of our systems. In a way, Google Tag Manager helps us to standardize the events across all of the systems we are using.
Power to do things without a developer
Before Google Tag Manager, website tracking used to be complicated. For each event and system you were using you had to ad small parts of the code in the website. At least a basic understanding of the code was required and for more complicated things one would need a developer‘s help. Google Tag Manager enables you to do everything connected to the tags yourself. It is super easy to use and at the same time, you don’t interfere with the actual website code (most of the time). Although we recommend that, at least at the beginning, you make a consultation with your dev team before implementing anything.
What Is Google Tag Manager?
Google Tag Manager is a tag management system (TMS) that allows you to quickly and easily update measurement codes and related code fragments collectively known as tags on your website or mobile app. Once the small segment of Tag Manager code has been added to your project, you can safely and easily deploy analytics and measurement tag configurations from a web-based user interface.
Google Tag Manager is a system that puts you in charge. It is basically a dashboard. It watches what is going on on your website; all the different behavior flows. Then based on what you‘ve trained it to do, it will take different actions. It can send conversions to Facebook Pixel or Google Ads, it can collect the data and send it to Google Analytics or it can fire scripts like Hotjar in certain pages.
Tags in Google Tag Manager
Tags are segments of code provided by analytics, marketing, and support vendors to help you integrate their products into your websites or mobile apps.
Tags are ways to tell Google Tag Manager what to do. Basically, tags are code snippets provided by Facebook Pixel, Google Analytics, Hotjar, LinkedIn, Twitter, CRM, and other systems you are using. Instead of copying and pasting all of those tags in all of the pages of a website you can use Google Tag Manager to do that. Tag Manager offers a bunch of predefined tags and also a custom HTML option for the rest of the tags.
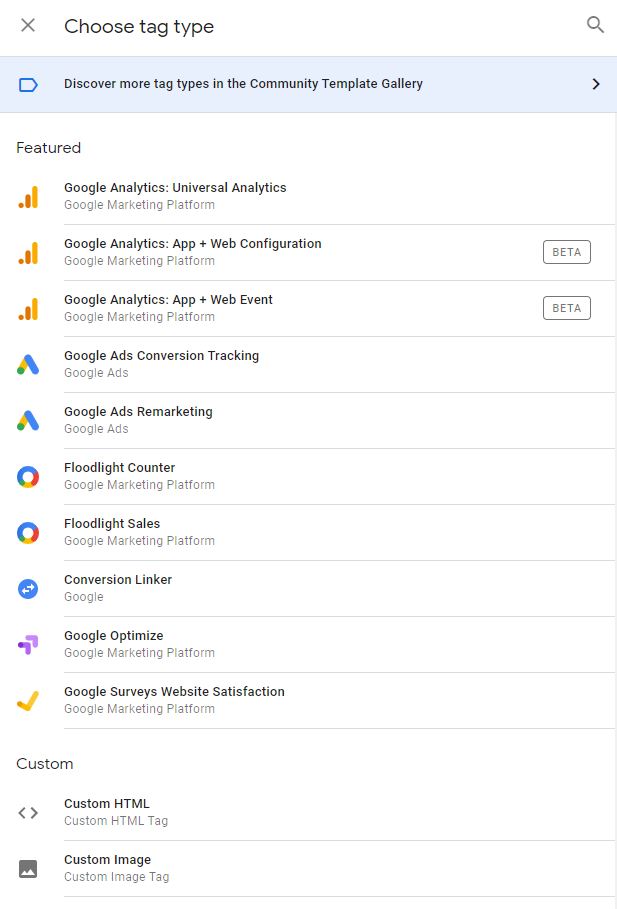
For each action you want to do with Google Tag Manager you need a different tag. For example, on the thank you page you will have Facebook Pixel pageview tag to track pageviews and another FB Pixel conversion tag to track conversions.
Triggers in Google Tag Manager
The most useful way to think about triggers is asking yourself: when do you want Google Tag Manager to take action?
Tags fire in response to events. In Google Tag Manager, a trigger listens to your web page or mobile app for certain types of events like form submissions, button clicks, or pageviews. The trigger tells the tag to fire when the specified event is detected. Every tag must have at least one trigger in order to fire.
In the previous chapter, we got to know tags. Let’s say you have placed FB Pixel on the website using Google Tag Manager. When do you want FB Pixel to be fired? On every pageview? Then pageview is the trigger. Whenever pageview occurs, tag manager will fire the FB Pixel pageview tag and send the pageview event into FB Pixel. The same goes for any other system you are using. The trigger can be any action. Like when a video si played at least 25% when a certain button is clicked or an item is added to the cart. So tags are what you want Google Tag Manager to do and triggers are when you want Google Tag Manager to do it.
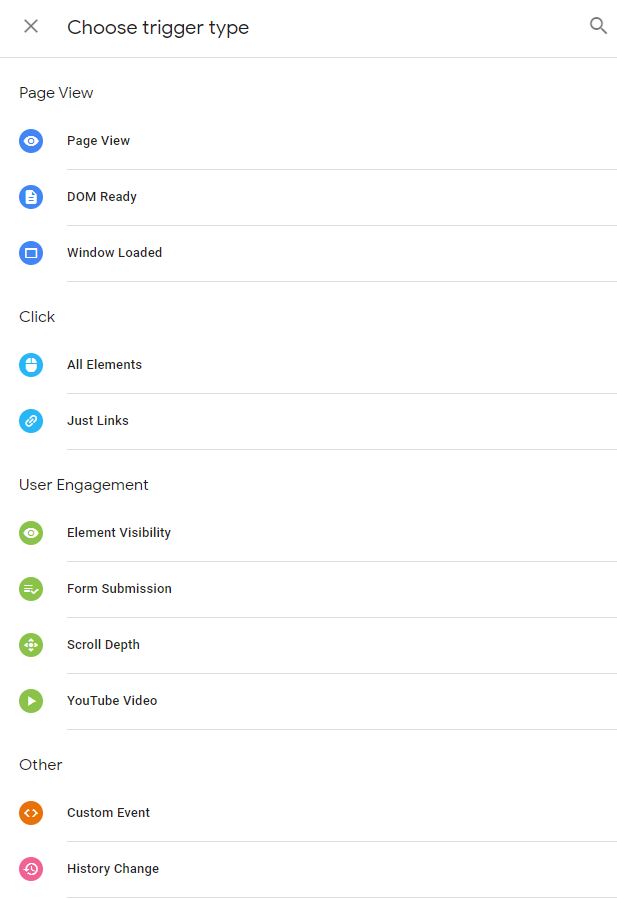
Google Tag Manager has 4 types of triggers. Pageview, click and user engagement are predefined triggers made for tracking user behavior. All of these are super useful. With the scroll depth trigger, for example, you can easily track how deeply the users are scrolling through your pages. If you click on one of the triggers, you can set up the firing conditions.
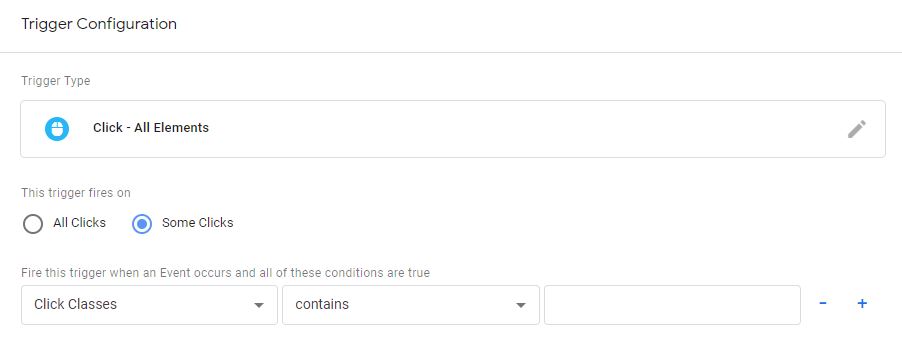
Multiple options, like page path, click class or on-screen duration are available. Most of the time, you will probably use those predefined triggers. However, in case you want to set up something more advanced, there is also the ‘other‘ segment, where you can build triggers exactly the way you want to.
Variables in Google Tag manager
Variable is information that Google Tag Manager needs in order to do its job. Let us go back to the case of the pageview. The pageview tag is telling the platform somebody is on the page. But how does the tag know which page the user is on? This piece of information is provided by the variable. So in the case of the pageview, the variable tells the page path. And when the user is moving through the purchase funnel, the variable stays on the page path, but it sends different values for each step (main page, product page, checkout steps, thank you page).
To a computer programmer, a variable is a symbol in code that can be used to represent a value that will change. A Tag Manager variable performs that same function.
Multiple variables can be associated to a trigger or a tag. For example, when someone makes a purchase, we are sending the variables like price, product name, quantity, and so on.
Built-in variables
From a high-level perspective, we have two types of variables, built-in and user-defined ones. You can find both types of variables if you navigate to Google Tag Manager and click Variables on the left side menu bar. To enable built-in variables, you just have to check the boxes:
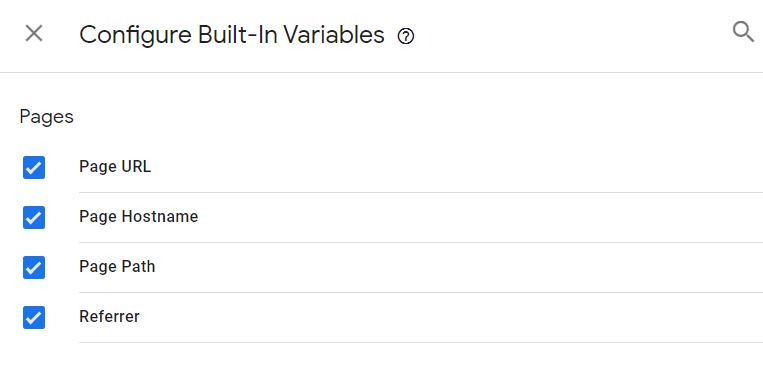
This applies to standard things like following the page URL in the above image. With built-in variables, you get information on Pages, Utilities, Errors, Clicks, Forms, Videos, Scrolling, Element Visibility, and so on.
User-defined Variables
This is the section where you can really customize things. You can, for example, grab information from the URL, read cookies or set up custom javascript to pull things from the data layer.
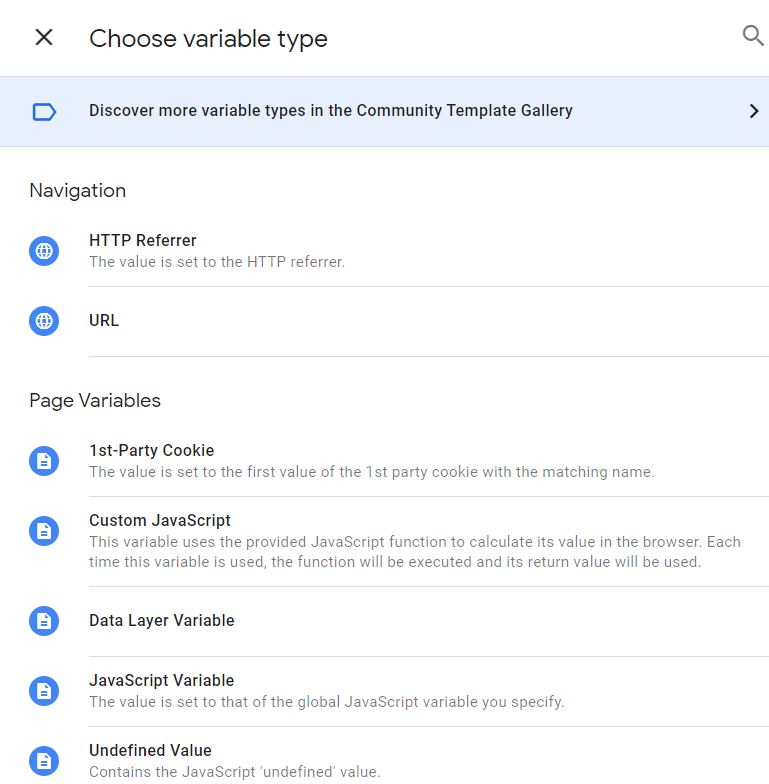
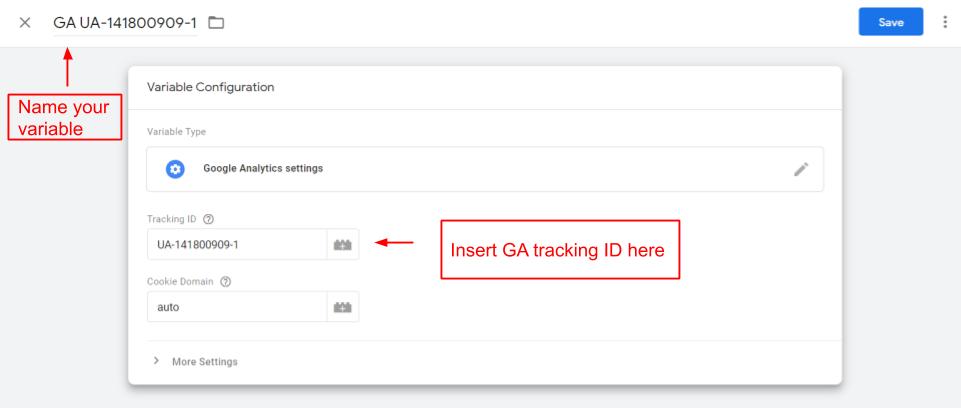
For beginners, the most important custom variable is probably Google Analytics settings which are used to pass information to Google Analytics in all sorts of ways.
Go to Google Tag Manager, navigate to Variables, User-Defined variables, click “New” and click on the pencil in the top right corner of the pop-up that will show up. Now scroll to Google Analytics settings and click on it. Insert your tracking ID, name the variable, and click save.
Data Layer
This is the place where you temporarily store data so you can reference it later. In practice, that means Google Tag Manager is storing the eCommerce data like purchase long enough so you can send that data to all the different platforms like Google Analytics, FB Pixel and CRM. Think of the Data Layer as a place where you can temporarily store details.
Google Tag Manager functions best when deployed alongside a data layer. A data layer is a JavaScript object that is used to pass information from your website to your Tag Manager container. You can then use that information to populate variables and activate triggers in your tag configurations.
Keys and Values
This is the place where you temporarily store data so you can reference it later. In practice, that means Google Tag Manager is storing the eCommerce data like purchase long enough so you can send that data to all the different platforms like Google Analytics, FB Pixel and CRM. Think of the Data Layer as a place where you can temporarily store details.
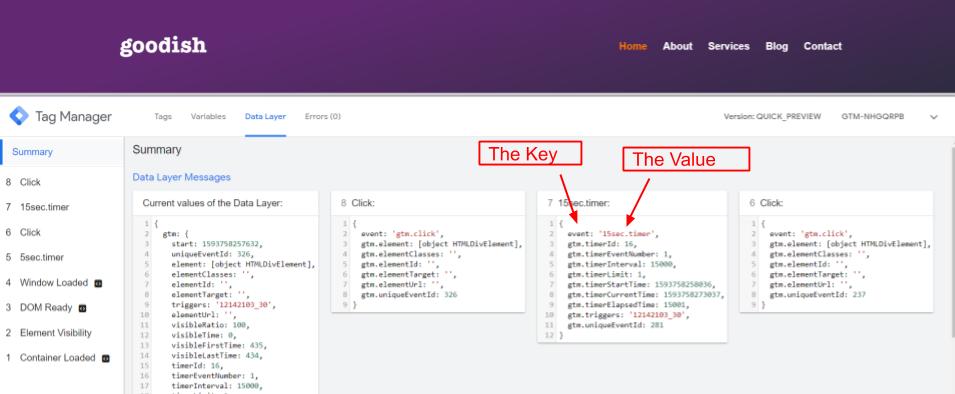
Data in the Data Layer is stored in “keys” and “values”. The price is the key and $29 is the value. Video action is the key and “play”, “paused”, “watched 15%” are the values. So the keys and values are the pieces of information you are interested in.
Preview Mode
This is the Google Tag Manager debugging feature. We used the preview in the data layer image above. To get it, click on the Preview Button in your Google Tag Manager. You should get an orange alert notifying you that you are in the preview mode. Then refresh your website.
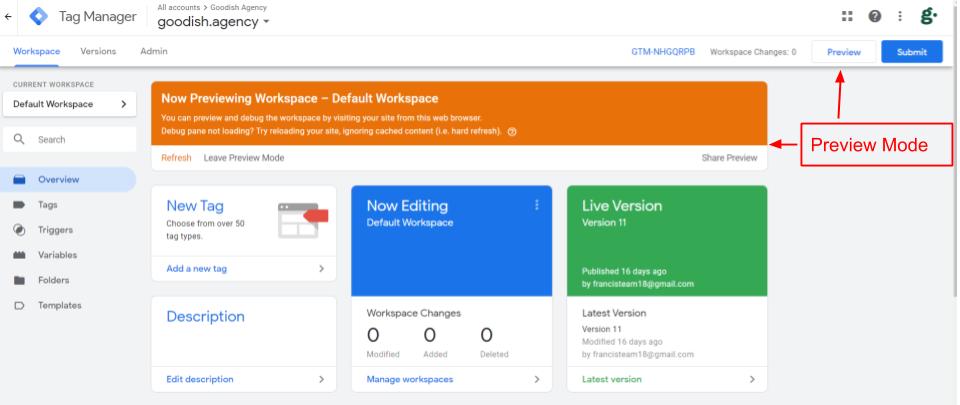
So preview is a way for you to check and make sure that everything you just did in Tag Manager is working. That all triggers, tags, and variables are working.
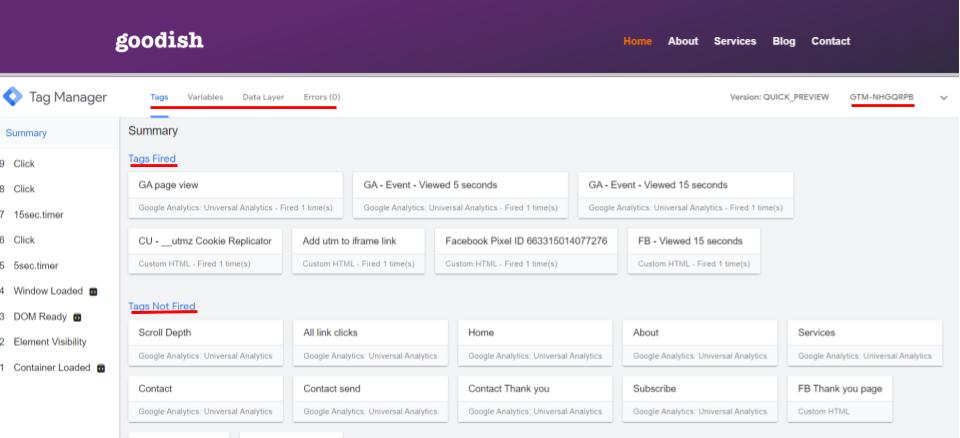
In the top bar of the preview mode, you can navigate between Tags, Variables, Data Layer, and Errors. Now you have to perform different actions on the website and when you do so, you will see how different tags are fired and how the data in data layer changes.
We hope this gave you a good overview of what Google Tag Manager is, what are its different features, and how to use google tag manager for e-commerce and SaaS companies.
Now you’re ready to set up Google Analytics with your GTM or simply reach out to Goodish, your designated Google Tag Manager Agency who can ensure your tracking is set up correctly to achieve better conversions.


