So, you’re ready to set up Google Analytics 4 (GA4) on your website. That’s great news! GA4 is a super helpful tool that can tell you all sorts of things about how people use your website. It can help you figure out what’s working and what needs improvement. But here’s the thing: setting it up can be a bit tricky.
Even small mistakes can mess up what the tool tells you. And if you’re making decisions based on wrong information, that’s not good for anyone. That’s why it’s really important to get it right from the start.
In this blog, we’re going to talk about the top 10 mistakes people often make when they’re setting up GA4. We’ll tell you what to watch out for and how to fix these issues. This way, you can make sure you’re getting the most useful and accurate information possible from GA4.
If you’re looking for an agency with a deep understanding of Google Analytics 4 and a commitment to delivering real, measurable results, consider hiring Goodish Agency as your trusted partner. Click here to discover our GA4 expertise.
Table of Contents
1. Ignoring Data Retention Settings
2. Failing to Verify Domain
3. Overlooking Event Tracking
4. Not Using Filters
5. Inconsistent Naming Conventions
6. Neglecting Mobile Users
7. Ignoring User Permissions
8. Ignoring GA4 Alerts and Notifications
Bonus 9: Not Setting Clear Objectives
1. Ignoring Data Retention Settings
The Mistake
If you stick with the default settings for how long GA4 keeps your data, you might find that you lose some really important information after a certain period. This is especially problematic if you’re trying to look at long-term trends or keep records for extended periods.
The Fix
To avoid this, you should go into the settings of your GA4 account and check how long data is being kept. You can change these settings to make sure that your data is stored for as long as you need it.
Whether you need to keep data for a few months or several years, adjusting these settings ensures you have access to the information when you need it. This way, you can make better decisions based on a more complete set of data.
Here’s how you can change the data retention settings in Google Analytics 4 (GA4):
1. Open your web browser and go to the Google Analytics website. Log in using your Google account credentials.
2. Once you’re in your GA4 dashboard, look for the “Admin” button, usually located at the bottom left corner of the screen.
3. In the Admin panel, you’ll see columns like: Account, Property, Data display, Data collection… Under the “Data collection and modification” column, select the Data retention.
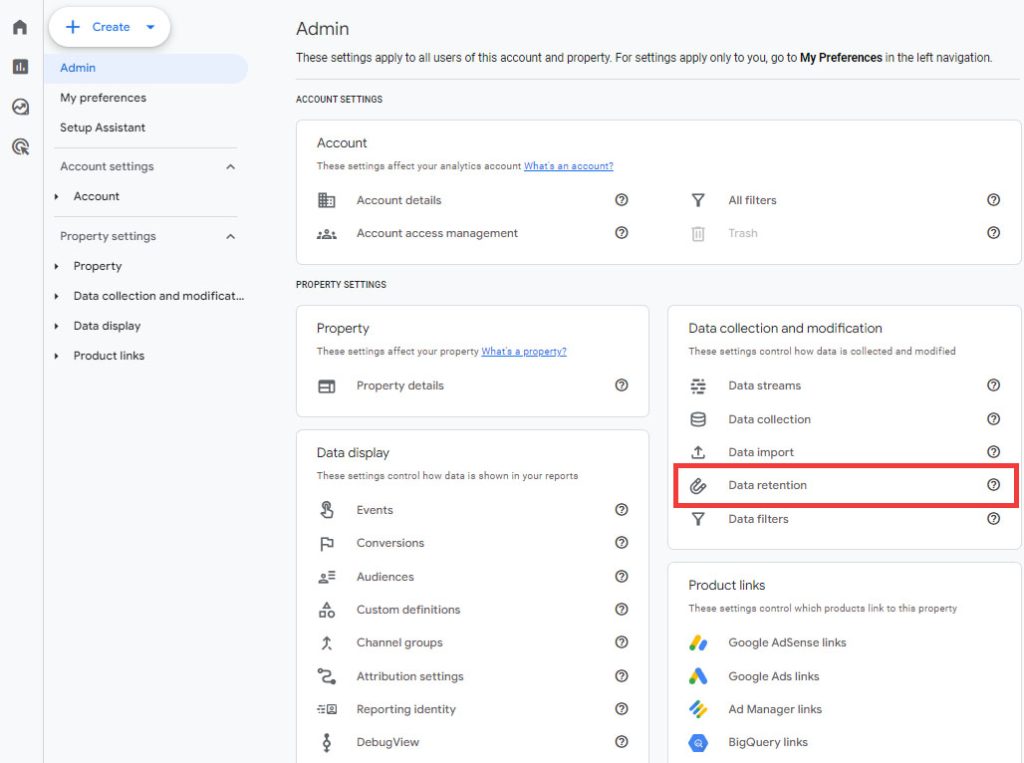
4. Under “Data retention,” you should see an option for “Event data retention.” Click on it to view the current settings.

5. You’ll see a drop-down menu that allows you to select the length of time you want to keep your data. Options usually range from 2 months to 14 months or more. Choose the one that best suits your needs.
6. After you’ve made your selection, don’t forget to click the “Save” button to apply the changes.
2. Failing to Verify Domain
The Mistake
Not verifying your domain during the GA4 setup can lead to problems like incorrect data and security risks. If you don’t verify, you might collect data from the wrong website or expose your site to fake traffic. This can distort your analytics and compromise the security of your data.
The Fix
Verifying your domain is an essential step in setting up GA4. It confirms that you are the owner of the website you want to track, ensuring that the data you collect is both accurate and secure. Taking this step can prevent many issues and is highly recommended for anyone using GA4.
To verify your domain in GA4, follow these steps:
1. Log in to your Google Analytics account and go to the Admin section.
2. Under the Data collection and modification column, click on “Data Streams.”
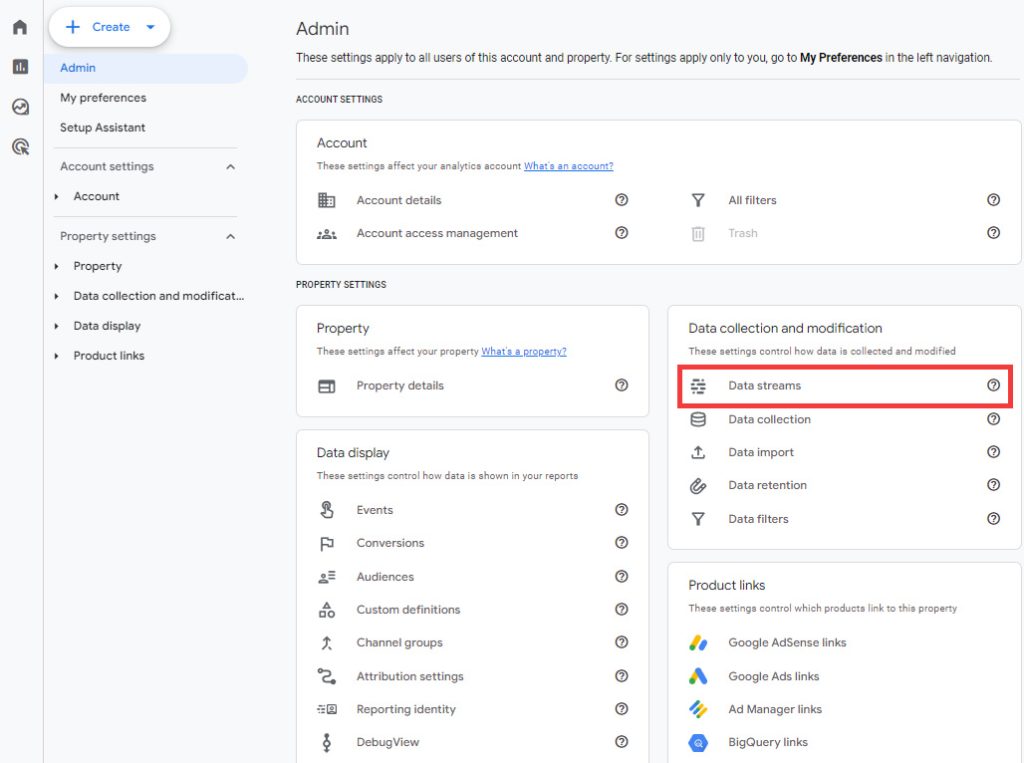
3. Choose the data stream for your website and click on it.
4. Scroll down to find the “Tagging Instructions” section, which will provide you with a tag to add to your website’s HTML code.
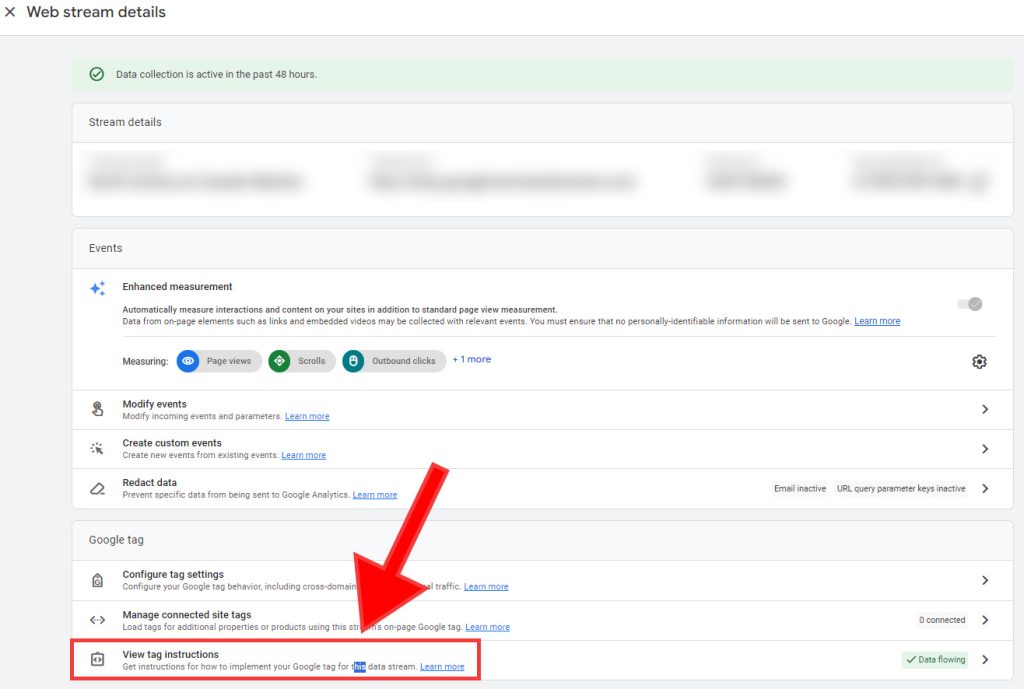
5. Copy this tag and paste it into the head section of your website’s HTML code.
6. Once the tag is added, go back to the Data Streams section in GA4 and click on “Check Connection” to verify that the tag is working correctly.
3. Overlooking Event Tracking
The Mistake
If you don’t pay attention to event tracking, you’re letting go of a golden opportunity to really understand what your website visitors are up to.
You won’t know what buttons they’re clicking, what forms they’re filling out, or even how they’re interacting with the videos you’ve posted. This lack of information can leave you in the dark about what’s effective on your website and what’s not.
The Fix
The first step is to figure out which actions on your website are most important for your business. Is it the “Buy Now” button? Or maybe it’s the form that people fill out to subscribe to your newsletter?
Once you’ve identified these key interactions, you can set up event tracking to monitor them. This way, you’ll know exactly what actions people are taking, allowing you to make informed decisions for future updates or changes to your website.
To set up event tracking, you’ll need to:
1. Go to the Admin section in your Google Analytics 4 account.
2. Look under the Data display column and click on “Events.”
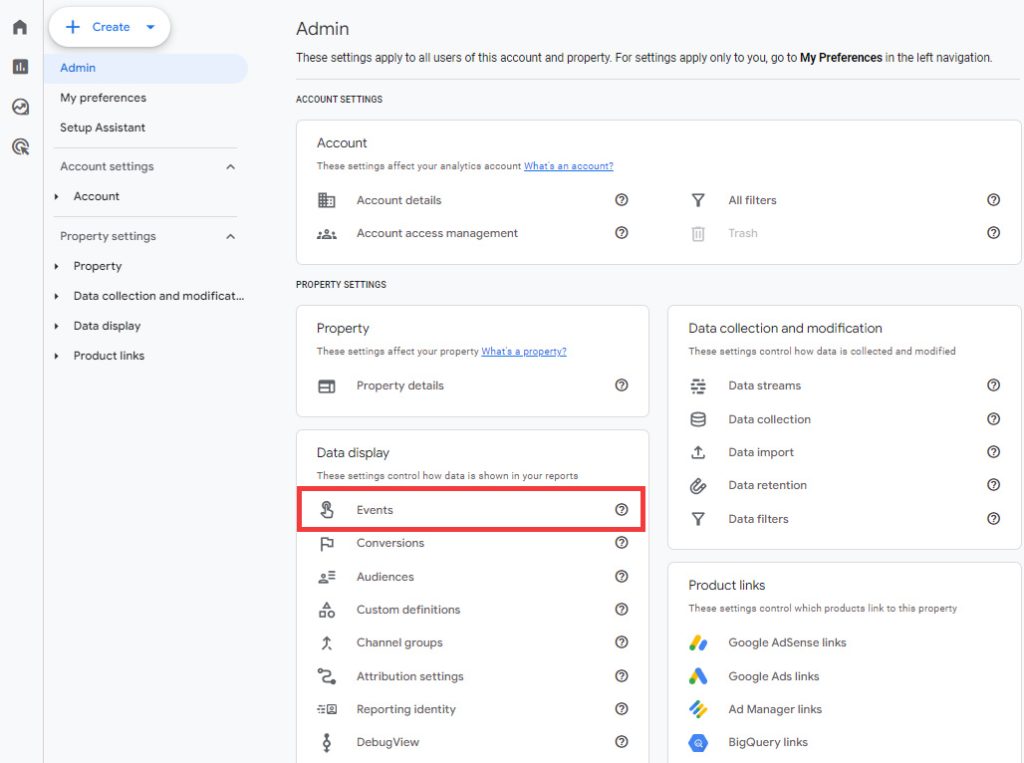
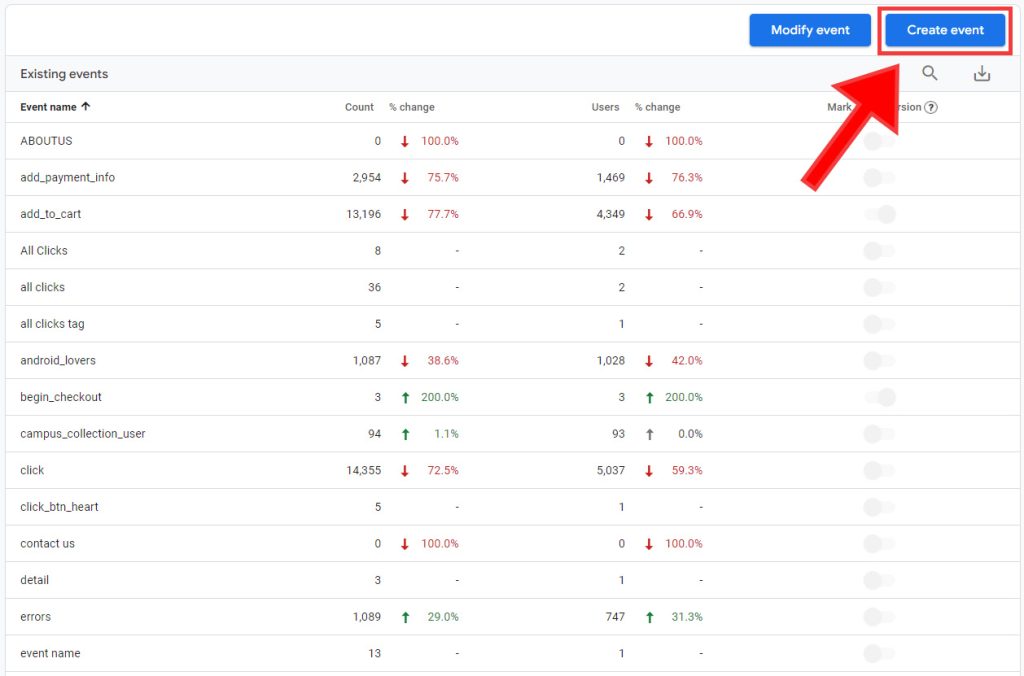
3. You’ll see some events that are automatically tracked, but you’ll probably want to add your own custom events that are specific to your website’s needs.
4. Click on “Create Event” and follow the steps to name your event and set the conditions for when it should be recorded.
Events We Always Track:
Scroll Events: To understand how far down the page users are scrolling.
5s, 15s, and 60s Timer Events: To gauge user engagement over specific time intervals.
All Contact Forms: To monitor how often forms are being filled out and submitted.
E-commerce Events: To track user interactions with product listings, add-to-cart actions, and purchases.
4. Not Using Filters
The Mistake
If you don’t set up filters, your data can get messy. Imagine you’re trying to figure out how many people visit your online store, but the numbers also include visits from your own team who are updating the website. This can give you a false sense of how well your site is doing and can mess up your understanding of your audience.
The Fix
Filters help you keep your data clean by leaving out visits from your own company or other sources you don’t want to track. This makes sure you’re only looking at useful information.
One of the first things you should do is set up filters to exclude internal traffic, like visits from your own company’s IP addresses. This way, you’re only looking at data from real visitors, which will help you make better decisions.
Here’s how to set up a basic filter in GA4:
1. Go to your Google Analytics 4 account and click on “Admin” at the bottom left corner.
2. Under the “Data collection and modification” column, click on “Data Filters.”
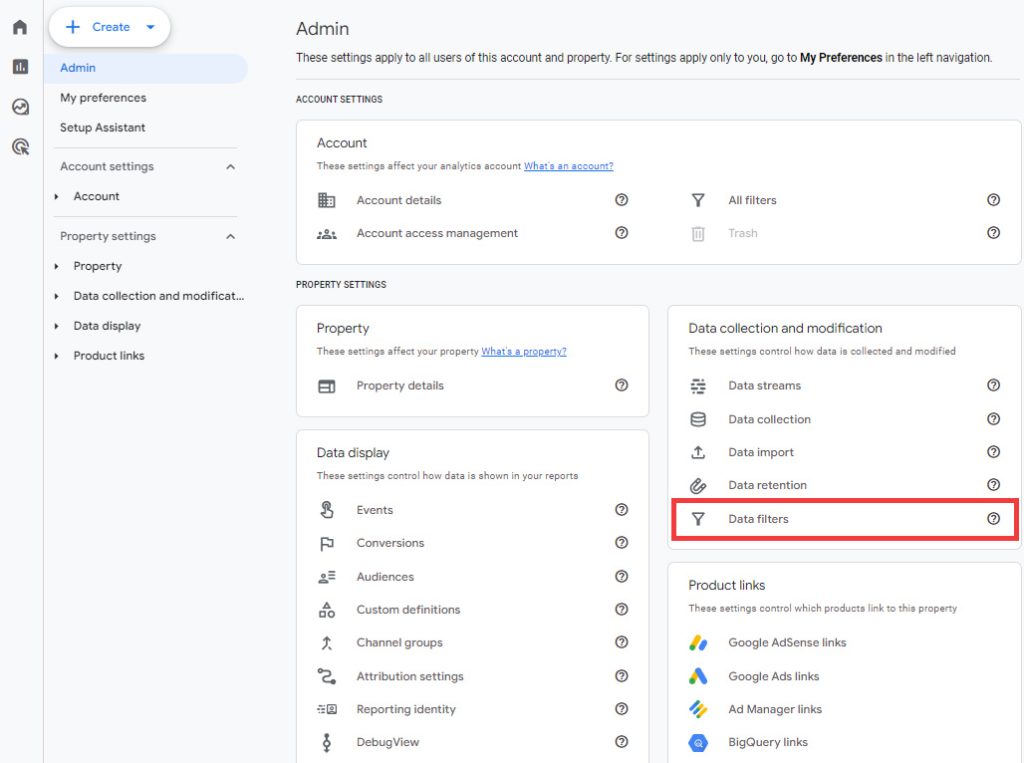
3. Click on “Create New Filter.”
4. Name your filter and choose what type of traffic you want to exclude. For example, to exclude internal traffic, you’d choose “IP Address” from the list.
5. Enter the IP addresses you want to exclude and click “Save.”

5. Inconsistent Naming Conventions
The Mistake
Using different names for similar things in your GA4 setup can make everything confusing. Imagine trying to find a specific file in a folder where everything is randomly named. You’d waste a lot of time just searching. In the same way, inconsistent naming can make it hard to find what you’re looking for in your data.
The Fix
To avoid this mess, decide on specific names for events, properties, and other parts of your GA4 setup and use them consistently.
Think of it like labeling folders on your computer; if everything has a clear and consistent name, you’ll know exactly where to find it when you need it. This will make your data easier to understand and save you time in the long run.
6. Neglecting Mobile Users
The Mistake
If you only pay attention to people visiting your website from a computer and forget about those using their phones, you’re missing a big part of the story. It’s like only listening to one side of a conversation; you won’t get the full picture.
Nowadays, many people browse the internet on their phones, so not tracking mobile users could mean you’re missing out on valuable information.
The Fix
To get a complete view, make sure your GA4 setup works well for tracking both computer and phone users. This way, you’ll know how everyone is interacting with your website, not just a portion of your audience. It’s like listening to both sides of a conversation; you get a much clearer understanding of what’s going on.
7. Ignoring User Permissions
The Mistake
If you don’t set up user permissions, you risk allowing people who shouldn’t have access to your GA4 data to view or even change it. This can be a big problem, as it could lead to incorrect data and compromised security.
The Fix
To keep your data safe and accurate, it’s important to set up user roles and permissions in GA4. This way, you can decide who gets to see what data and who has the ability to make changes.
By doing this, you ensure that only authorized individuals can access and modify your analytics, keeping your data secure and reliable.
Here’s how you can set up user roles and permissions in Google Analytics 4 (GA4):
1. Open your web browser and go to the Google Analytics website. Log in using your Google account.
2. Once you’re logged in, look for the “Admin” option, usually located at the bottom left corner of the dashboard.
3. In the Admin panel, you’ll see columns like: Account, Property, Data display, Data collection… Under the “Account” column, select “Account access management”
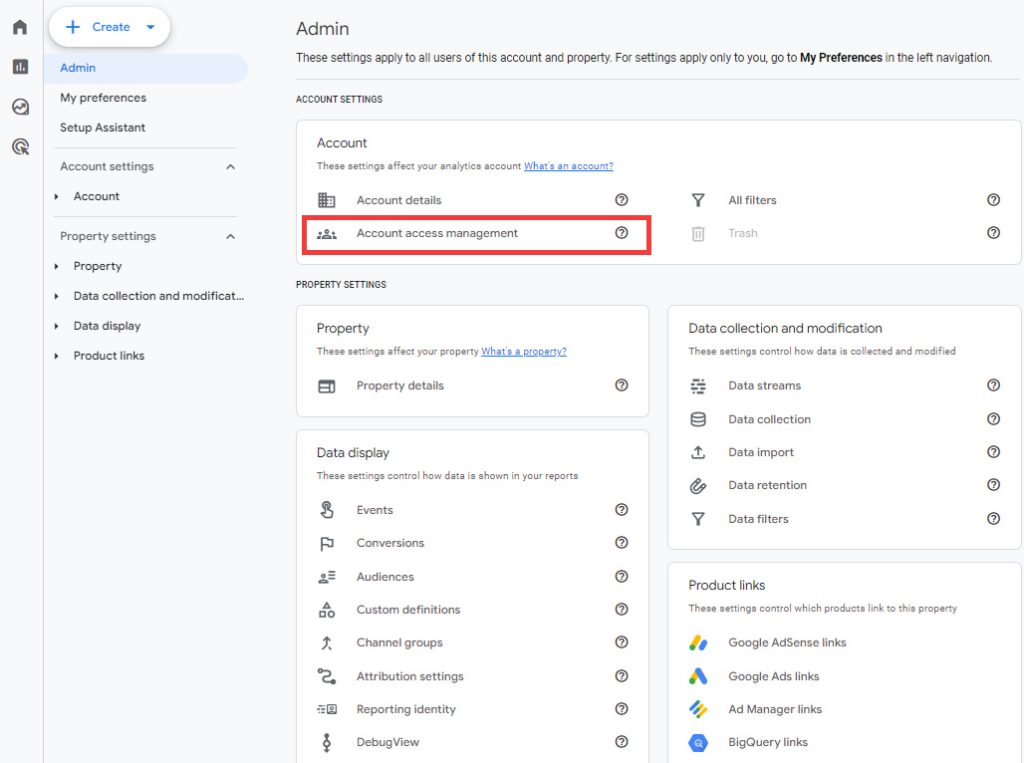
4. Click on the blue “+” button, usually located at the top right corner, and then select “Add users.”
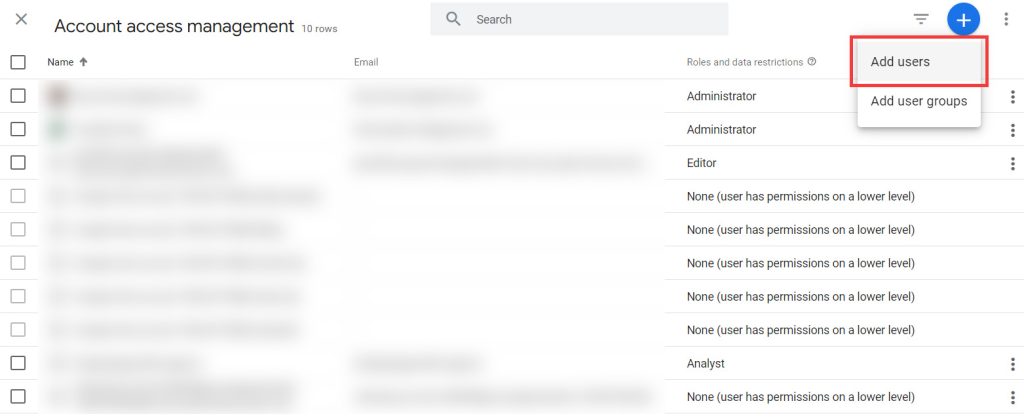
5. You’ll be prompted to enter the email addresses of the users you want to add. Make sure these are the Google Account email addresses of the people you want to give access to.
6. After adding the email addresses, you’ll see options for assigning roles. GA4 offers different levels of access like “Viewer,” “Analyst,” “Editor,” etc. Choose the appropriate role for each user.
7. Once you’ve assigned roles, you can choose to notify the new users via email. Click “Save” to finalize the settings.
8. It’s a good idea to double-check the permissions and maybe even ask the newly added users to log in and confirm they have the access level you intended.
8. Ignoring GA4 Alerts and Notifications
The Mistake
If you don’t pay attention to alerts and notifications, or if you haven’t set them up at all, you could miss out on important changes that happen on your website.
For example, if there’s a sudden drop in traffic or a spike in sales, you won’t know about it right away. This could delay your response, causing you to miss out on fixing issues or taking advantage of opportunities.
The Fix
To stay on top of things, it’s a good idea to set up custom alerts in GA4 for the metrics or events that are most important to your business. These alerts will notify you when something significant happens, like a big change in user behavior or website performance.
This way, you can take immediate action, whether that’s solving a problem or leveraging a new opportunity. Setting up alerts is a straightforward process in GA4, and it can give you peace of mind knowing that you’ll be informed of important changes as they happen.
Bonus 9: Not Setting Clear Objectives
The Mistake
If you start using GA4 without a clear plan, you’ll likely find yourself overwhelmed by all the data and options available.
You could spend a lot of time exploring different features and metrics, but without a specific goal, you won’t be able to effectively use the information to improve your website. You’ll have lots of numbers and charts, but you won’t know what they mean or how to use them to make your website better.
The Fix
Before you even open GA4, take a step back and think about what you really want to know. Do you want to find out which pages on your website are most popular? Are you curious about where your visitors are coming from? Or maybe you want to know if a new advertising campaign is bringing in more visitors?
Once you have a list of questions or goals, then you can go into GA4 and set it up to give you those answers. Having a clear plan for using GA4 ensures that you focus on the metrics and features that are most relevant to your goals. This way, you can directly apply the insights you gain to make meaningful improvements to your website.
Bonus 10: Skipping the Test Phase
The Mistake
Activating your GA4 setup without any prior testing can lead to errors in your data collection. These errors can distort your understanding of user behavior and compromise the quality of your analytics.
The Fix
It’s crucial to test your GA4 setup in a controlled setting, known as a staging environment, before making it live. This allows you to identify and correct any issues in advance, ensuring that your live setup will provide accurate and reliable data.
Conclusion
Setting up Google Analytics 4 is not just about clicking a few buttons; it’s about making informed decisions that will shape the quality of data you collect. The last thing you want is to base your business strategies on inaccurate or incomplete data.
We’ve walked you through common pitfalls, from the importance of setting clear objectives to the need for rigorous testing and the significance of user permissions.
Each of these aspects plays a crucial role in ensuring that your GA4 setup is not just functional but optimized for your specific needs.
Remember, the field of digital analytics is always changing. New features and updates come out all the time, and staying current is essential to make the most of GA4. So, keep an eye on alerts and notifications, and feel free to update your settings as needed.
By steering clear of these mistakes, you’re not just avoiding problems; you’re making sure your data is accurate, useful, and easy to act on.
We at Goodish agency are experts in digital marketing and we can help you to utilize AI to reduce your costs and boost your performance. Read more about our services.