Seeking innovative ways to captivate your audience with video? Wave.video offers a platform for beginners to easily create, edit, and store their content.
But because Wave.video has so many features, using it might seem overwhelming at first. So that’s why we’re here to help.
We’ve been through the process and are here to guide you step-by-step. In this blog, we’ll exclusively focus on helping you create your very first video with Wave.video. From initial setup to hitting the ‘publish’ button, we’ve got you covered.
If you are in the process of deciding if the platform is right for you, check out our other blog Pros and Cons of Wave.video: Is It Right for You?.
If you want to explore other platforms you can take a look at Wave.video vs Filmora: A Comparison for Content Creators and InVideo vs Wave.video – Comparison [2023].
1. Getting Started
Joining the Wave.video Community: Registering is more than just a sign-up. It’s your entry into a community of creators. By joining, you access top-notch video tools and connect with a network where creativity thrives.
Choosing the Right Plan: Wave.video has developed various subscription plans to accommodate different users, from hobbyists to startups and established businesses. Each plan is designed to meet specific video creation needs.

Each subscription plan comes with its set of features and benefits:
Free Plan: Ideal for beginners, this plan offers basic video editing capabilities with a watermark, access to a stock library of 2M assets & templates, and video hosting with certain limitations.
Streamer Plan: Priced at $16/month, this plan is designed for those looking to venture into live streaming. It offers advanced live streaming features, video recording capabilities, and more.
Creator Plan: At $24/month, this plan is for the more serious video creators. It provides extended video editing time, a larger stock library, and additional features like stylish captions, text to speech, and more.
Business Plan: For $48/month, this is the ultimate plan for businesses. It offers the most extended video editing time, advanced live streaming, extensive video hosting, and collaborative features like shared login.
Quick tip: Always start with a clear understanding of your video creation frequency, desired features, and budget, so that you get the most out of your subscription.
Exploring the Interface: The interface is simple and functional. Spend some time exploring. Get to know the dashboard, editing tools, and media library. Understanding these early will make your video creation smoother and more enjoyable.
2. Building Your Video’s Foundation
Selecting and Customizing Templates: Wave.video offers a wide range of templates suited for various content types. These templates make it easy for both beginners and professionals to create polished videos.
The platform offers templates for every video goal, from birthday wishes to product launches or educational content. This variety ensures you’ll always find a template that matches your theme and purpose.
For those unsure about which template to pick, Wave.video offers guidance. Based on the video’s intended platform (e.g., Instagram Story, YouTube, Facebook Feed) or its purpose (e.g., advertisement, announcement, tutorial), it can suggest templates that would be the most effective.
They regularly update their template library, so users always have access to fresh and modern designs.
Organizing Media Files: When creating videos it’s important to stay organized. As you gather videos, images and audio, having a structured system helps.
That is why Wave.video offers tools made especially for this. You can make separate folders for projects and group related files. This makes editing faster and finding files easier.
Plus the tagging and categorizing options help you sort your media even better.
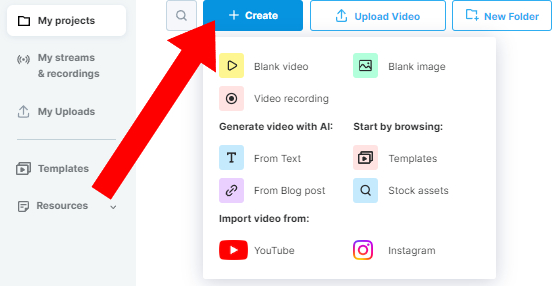
Step 1: Create a New Folder

Step 2: Rename a folder
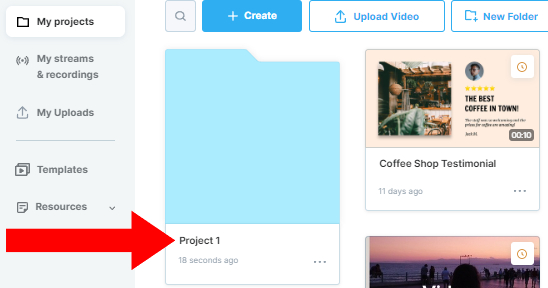
Step 3: Create or upload new video
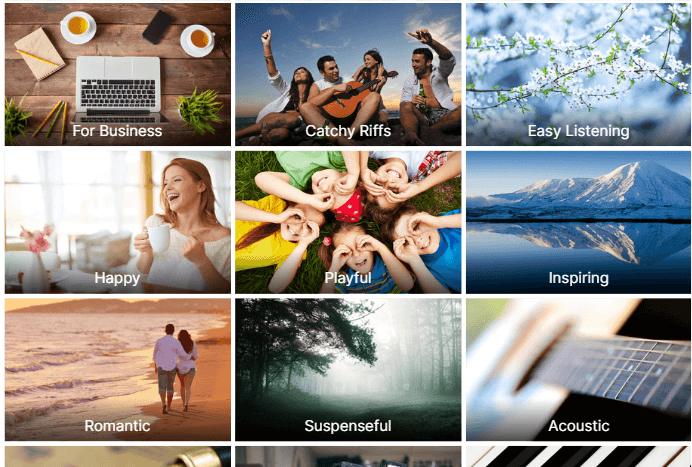
Using Stock Media: If you don’t have a large personal media collection, Wave.video’s stock media is a great solution. They offer a wide variety of stock videos, images, and audio to fit different themes.
They have everything from calming nature footage, lively music, to professional photos and much more.
3. Enhancing Your Video’s Appeal
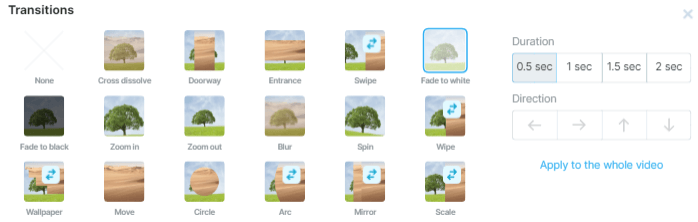
Adding Animations and Graphics: Animations and graphics are essential to highlight your content. They help stress important points, guide viewers, and enrich your story.
Wave.video provides a wide range of animation choices, from simple to bold. You can use dynamic intros, animated charts, or gentle motion effects to enhance your video. Plus, you can customize these animations to fit your brand.
When using them you need to be careful, because an overload can divert attention from the core message.
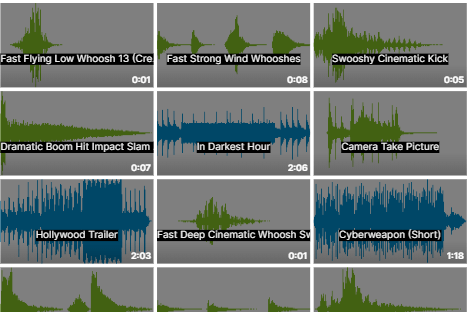
Incorporating Sound Effects and Music: Audio is as important as visuals in any video project. Wave.video offers a wide-ranging library of audio options to choose from, including sounds that are perfectly suited to any mood or theme.
It also features precise editing tools that make syncing audio with video an easy process.
Here are some examples of what types of music to use for different video content with Wave.video:
Corporate Videos:
Use instrumental music with a steady and professional tone.
Examples: Corporate background music, light jazz, or classical music.
Product Demos:
Choose upbeat music to create excitement.
Examples: Energetic pop, electronic, or modern rock.
Travel Vlogs:
Opt for music that complements the destination or adventure.
Examples: Local folk music, tropical beats, or ambient sounds.
Educational Videos:
Select calming music that aids concentration.
Examples: Classical music, soft piano, or ambient instrumental.
Event Highlights:
Use music that reflects the mood of the event.
Examples: Pop music for celebrations, classical for formal events.
Interviews and Podcasts:
Background music that is unobtrusive but adds a professional touch.
Examples: Soft jazz, light acoustic, or ambient instrumental.
Social Media Advertisements:
Music that matches the ad’s style and target audience.
Examples: Trendy pop, hip-hop, or electronic dance music.
Comedic Content:
Select playful and fun music to enhance humor.
Examples: Quirky tunes, upbeat jazz, or comedic sound effects.
Remember that the choice of music should align with the mood and message of your video.
Here are some examples of when and how to use sound effects in different types of videos with Wave.video:
Corporate Videos:
Use subtle sound effects like button clicks for transitions between sections.
Product Demos:
Incorporate product-related sound effects, such as the click of a camera shutter for a photography demo.
Travel Vlogs:
Include natural ambient sounds like birds chirping or ocean waves for an immersive travel experience.
Educational Videos:
Use sound effects like a “ding” for correct answers in quizzes or interactive elements.
Event Highlights:
Enhance the atmosphere with crowd cheers, claps, or applause during significant moments.
Interviews and Podcasts:
Use subtle background ambiance or transitions between podcast segments.
Social Media Advertisements:
Incorporate sound effects that emphasize specific actions, such as a “swoosh” for fast transitions.
Comedic Content:
Use comedic sound effects like laughter tracks or whimsical effects for humorous moments.
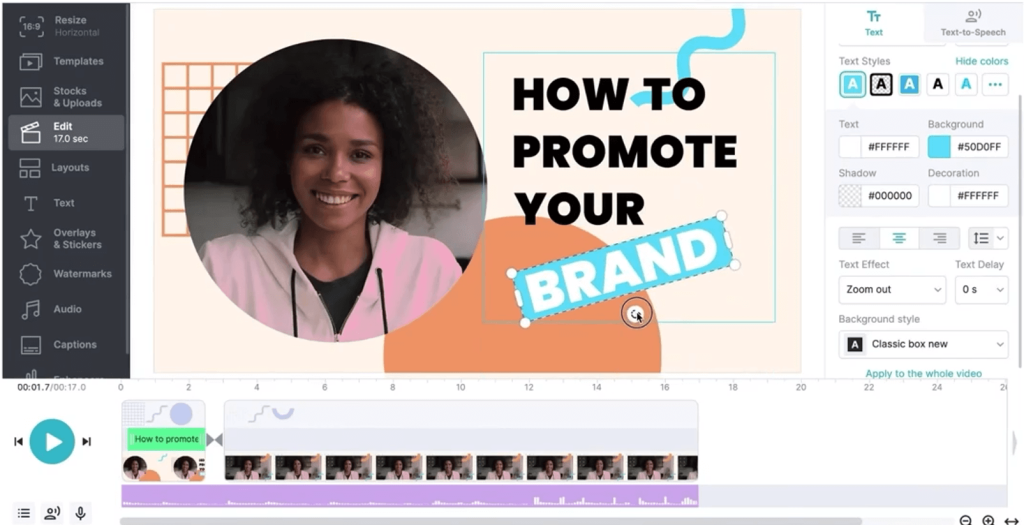
Layering with Text and Typography: Incorporating text into your video can serve multiple purposes. It can provide context, highlight essential information, or act as a call to action. This platform has advanced text tools that offer countless customization options.
You can pick fonts that match your brand, choose text animations, and control how text appears and disappears.
Dynamic text animations can make important messages stand out, leaving a strong impression.
4. Final Touches
In the final stages of video production, it is crucial to review and refine your work to ensure that it is the best it can be. This phase involves making last-minute improvements, refining visuals to ensure consistency, enhancing audio quality, and ensuring smooth transitions between scenes.
Additionally, you should check that the overall story or message flows smoothly.
Quick Tip: Get feedback, especially those who haven’t been closely involved in the video’s creation. Fresh eyes can spot issues you might have missed.
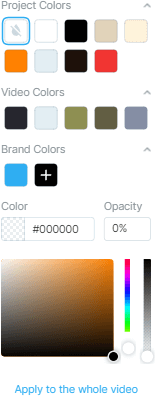
Color correction and lighting
Color Consistency: Review your video to ensure that colors remain consistent from scene to scene. Adjust brightness, contrast, and saturation if necessary to create a cohesive look.
Color Grading: Consider applying color grading techniques to enhance the mood of your video. You can use filters or presets to achieve cinematic or stylized looks.
Lighting Enhancement: If your video includes different lighting conditions, use Wave.video’s lighting adjustment features to balance and smoothen transitions.
Quick Tip: Always preview color and lighting changes on various screens to ensure they appear as intended across devices.
Crafting Captivating Thumbnails
Thumbnails are the first impression your video makes on potential viewers. Creating an engaging thumbnail is vital for attracting clicks and views.
The platform offers thumbnail customization options.

Optimizing for Different Platforms
Just as understanding export settings is important, optimizing your video for different platforms makes sure it performs well across different channels.
Platform-Specific Resizing: Resize your video to fit the dimensions and aspect ratios required by the platform you intend to publish on, whether it’s YouTube, Instagram, or Facebook.
Bitrate and Compression: Adjust the bitrate and compression settings to meet platform requirements while maintaining video quality.
Captions and Subtitles: Consider adding captions or subtitles if the platform or target audience benefits from them. Wave.video allows for easy caption integration.
Video Length: Ensure your video’s length adheres to the platform’s guidelines. Shorter videos are often more engaging on platforms like Instagram and TikTok, while longer content may perform better on YouTube.
Quick Tip: Create a checklist or template for each platform you commonly use. This ensures you don’t miss any essential steps during the export and optimization process, saving time and effort.
5. Taking Your Video Live
Now that your video is polished and ready to be posted, the next step is to consider how to effectively publish and promote it.
Wave.video makes this process easy with its range of versatile publishing options. It simplifies the process of getting your content out there and makes sure it reaches your target audience.
Here are some of its publishing options:
Embedding on Websites: The platform makes it easy for you to embed your video on your website, ensuring that it is readily accessible to your website visitors.
By embedding your video directly onto your website, you can provide an integrated and seamless user experience, keeping visitors engaged and on your website for longer.
Sharing on Social Media: Wave.video provides straightforward integration with popular social media platforms. You can share your video directly to your social media accounts.
Email Campaigns: Consider using your video as part of email marketing campaigns. Videos can boost email engagement and click-through rates.
Video Hosting: If you prefer to host your videos on dedicated platforms like YouTube or Vimeo, the platform allows you to export your video for these platforms.
Promoting Your Video Effectively
Sharing Across Multiple Channels: Don’t limit yourself to a single platform. Share your video on various channels, including social media, your website, and email newsletters.
Engaging with Your Audience: Actively respond to comments and engage with viewers who interact with your video. This gives a sense of community and encourages further engagement.
Behind-the-Scenes Insights: Share behind-the-scenes snippets or anecdotes related to your video. This personal touch can connect with your audience on a deeper level.
Analytics: Use video analytics to understand viewer engagement. Analyze metrics like views, watch time, and audience demographics. This data can inform your future content strategy and help you create more targeted videos.
Conclusion
With each video you craft, you’re not just creating content; you’re evolving as a creator. Embrace this journey as it’s a path of learning, progress, and endless creativity.
In this blog, we’ve covered every aspect of Wave.video, from its intuitive interface to its vast template collection and customization features. We’ve also explored the complexity of storytelling, the significance of striking visuals and exceptional audio, and the importance of optimizing and promoting your content.
We hope this information was helpful, and you’ve learned how to begin your video-making journey.
If you would like to explore other video creation platforms and how to get started there check out InVideo: User-Friendly AI Video Editing.
We at Goodish agency are experts in digital marketing and we can help you to utilize AI to reduce your costs and boost your performance. Read more about our services.